When asked if I have a favorite food, I usually blank. There’s so much delicious food in the world, and I’m so fickle: How can I possibly choose a single favorite food? And then I made pelmeni from scratch. And when I was describing them to a friend, I realized that they are, indeed, my all-time favorite food. Any time, any place, they are the perfect comfort food, beacons of sustenance and home. I’ve never realized that they are my favorite food because they are such a staple of growing up in a Russian-speaking household: always stocked in our freezer by the 50-count, always ready when we needed a quick meal, always soul-satisfyingly delicious.
Pelmeni are Russian meat dumplings. They can be filled with any combination of meats: beef, pork, lamb, veal, chicken. They are boiled, and can be served various ways: in chicken soup (similar to tortellini en brodo) or on their own tossed in sour cream. The way I grew up eating pelmeni — the only legitimate way, in my view — was tossed in butter, white distilled vinegar, and a sprinkle of cayenne pepper. I didn’t even know that other people ate pelmeni with sour cream until I was an adult. For me, sour cream was strictly reserved for vareniki (what most Americans know as pierogi). The addition of cayenne pepper, however, might be distinctly my father’s invention (thanks, Dad!).
I was too impatient to call up relatives for their pelmeni recipes (my mom has always bought them from Russian food stores in Brighton Beach. Side Note: Cafe Glechik on Coney Island Avenue probably has the best pelmeni and vareniki in the tri-state area). I had to know how to make them right away, so I did a Google search and came up with the recipe below based on an amalgam of dozens of recipes I found online.
The process is time consuming and a bit labor intensive. Instead of rolling out the dough, however, I made use of my pasta machine. Ironically, this is the first time I’ve used this machine, despite having owned it for over a year. One of the perks of making your own pelmeni is total control over the ingredients. This means, I used all pasture-raised eggs and meats for the dough and filling. I made a special trip to the Union Square Greenmarket to pick up pork from Flying Pigs Farm and beef from Bobolink Dairy & Bakehouse. Some traditionalists will say that the filling for these dumplings ought to be only ground meat and onions. I firmly believe that garlic makes everything better, and so I added it. My pelmeni, my rules! So, without further ado…
PELMENI (пельме́ни)
Makes about 100 dumplings
Ingredients
Filling:
1 pound ground pork
1 pound ground beef
1 large onion (6-8 oz.), finely chopped in a food processor or grated on a box grater
2 large garlic cloves, grated on a microplane grater
salt and freshly ground black pepper
Dough:
3 cups all-purpose white flour
2-3 fat pinches kosher salt
2 eggs
cold water (up to 1/2 cup)
Procedure
Start by mixing up all the filling ingredients in a large bowl. Season the mixture generously with  salt and pepper. I used a KitchenAid on low with the paddle attachment to give the filling a quick and thorough mix. You can definitely do it by hand. Cover with plastic wrap and let it rest in the fridge for at least an hour.
 I found that mixing the dough in a food processor was the easiest way. In the bowl of a food processor, combine the flour and salt. Give it a quick pulse to combine. Add the eggs and pulse a few times to incorporate. Now, with the processor running, slowly stream in water until the dough just comes together. Don’t overwork the dough. Dump the dough onto a well-floured surface and knead until smooth (about 5 minutes). Wrap tightly in plastic wrap and refrigerate to let dough rest, at least one hour.
To make dough by hand: Whisk together flour and salt in a bowl, then mound the flour in the center of a large wooden cutting board. Make a well in the middle of the flour, add the eggs. Using a fork, beat together the eggs and begin to incorporate the flour starting with the inner rim of the well. Gradually add the water as you mix the dough with your hands. As you incorporate the eggs, keep pushing the flour up to retain the well shape (do not worry if it looks messy). The dough will come together in a shaggy mass when about half of the flour is incorporated.
Start kneading the dough with both hands, primarily using the palms of your hands. Add more  flour, in 1/2-cup increments, if the dough is too sticky. Once the dough is a cohesive mass, remove the dough from the board and scrape up any left over dry bits. Lightly flour the board and continue kneading for 3 more minutes. The dough should be elastic and a little sticky. Continue to knead for another 3 minutes, remembering to dust your board with flour when necessary.
It’s easiest to roll out the dough in sections, so I  recommend cutting the dumpling dough in four pieces. On a lightly-floured surface, roll out one section to about 1/16″ inch thickness. If you’re rolling the dough in a pasta machine, I suggest rolling it to setting 5 (second to last thinnest setting). I used a biscuit cutter (about 1 7/8″ diameter) to cut out circles in the dough. Traditionally, Russian home cooks have been known to use drinking glasses to cut out the circles.
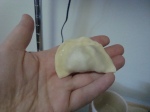
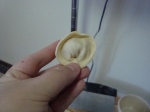
Place one level teaspoon of filling at the center of each  circle, fold the dough over to make a half-circle, and pinch the edges closed. (Your seam won’t hold if there is too much flour on the dough or if you accidentally get it wet. If the dough is floury, moisten the edges very lightly with a drop of water; if it is wet, add a tiny bit of flour.) Now bring the ends of the half-circle together until they overlap a little and pinch them closed to form a tortellini-like shape.


Repeat with the remaining dough and filling, placing the finished pelmeni or vareniki on a lightly floured surface and making sure they aren’t touching each other. At this point, you can either cook them or freeze them for later use.

To cook the dumplings, bring a pot of salted water to a boil, add pelmeni and stir so they don’t stick to the bottom. Technically, they are ready once they float to the surface, but I usually cook them for 2 more minutes to make sure the meat is cooked through. If you cook them too long, though, the meat can dry out and the dough fall apart.

To freeze the dumplings, place them in a single layer (not touching each other) on a metal cookie sheet and put in the freezer until the dough is frozen (at least an hour). Once the exterior of the dumplings is frozen, you can bag them without worrying about them sticking together.
As mentioned above, I serve pelmeni tossed in butter, white distilled vinegar, and cayenne. But, really, your imagination is your limitation on how to serve these deeply satisfying, perfect meat dumplings.

Note: You can use a special pelmeni mold to make things a bit faster. However, the foldover method I described above produces much prettier dumplings (dumplings, incidentally, that provide a little channel all the way around to hold onto butter, sourcream, vinegar, soup, etc.).


